
Yoga for Snowboarders
 Yoga can be a great way to train for the mountain during the off-season, and to help you recover from riding when the snow finally hits! The physical poses, called “asanas,” will help improve your body's overall flexibility and balance, while building crucial leg and core strength. With a regular yoga practice, you'll also be able to recuperate faster from spills and tough days.
Whether you're a black diamond daredevil or a bunny hill newbie, your snowboarding will definitely benefit from yoga. Keep reading to learn some key tips and tricks.
Stretch & Ride
Snowboarding can challenge muscles you didn't even know you had. A well-rounded yoga practice will utilize every muscle in your body, making it an essential element of cross-training for snowboarding! In addition, yoga offers many other benefits that will improve your snowboarding skills and experience, including:
- Stronger leg, back, and core muscles
- Improved spinal, neck, and hip flexibility
- Improved balance
- A calm mind and clear focus
- Improved stamina and energy
Yoga emphasizes focusing on the present moment. This practice will help you to fully experience and enjoy every moment on your board — whether it's a stormy, icy, or bluebird day on the slopes. Additionally, yogic breathing exercises, called “pranayama,” will help you breathe with ease and awareness in high altitudes and frigid conditions. In particular, Ocean Breath (Ujjayi Pranayama), helps to warm the body, making it an easy way to stay cozy on the chairlift on chilly days.
There are many different styles of yoga that will improve your snowboarding experience. For intense strength, balance, and flexibility, try Ashtanga, Power Yoga, or Bikram. For a soothing recovery, try Hatha, Restorative, or Yin Yoga. You might even want to choose one style for pre-season and a different one for the winter months!
Snowboarding can torch 450-600 calories per hour, depending on your age and weight! Staying in shape with cross-training is crucial for this high-energy sport.
Easy Rider
Start adding these poses to your pre- and post-riding routine. Move slowly in and out of each pose, and come out of the pose if you feel any pinching or jarring pain. Hold each pose for several breaths, and remember to keep your breath smooth and even. If your breath is strained, ease up a bit. Always work within your own range of limits and abilities. Most importantly, take it easy and have fun!
Full-body Strength: Warrior II

A powerful full-body strengthener, Warrior II — Virabhadrasana II (veer-uh-buh-DRAHS-uh-nuh) — also increases stamina. It stretches the groins and chest; and it also helps to relieve backaches and stimulate healthy digestion.
- Stand with your feet wide apart. Point your right foot to the top of the mat, and turn your left foot slightly inward.
- Raise your arms parallel to the floor, reaching out actively from fingertip to fingertip.
- Bend your front knee to 90 degrees, making sure to keep your knee over your ankle. Press back through the outer edge of your left foot.
- Keep your torso perpendicular to the floor, lengthening the space between your shoulder blades and broadening across your collarbones.
- Draw your tailbone slightly downwards, and gaze out across your right middle finger. Hold for up to one minute. Repeat on the other side.
Leg Strength: Crescent Lunge
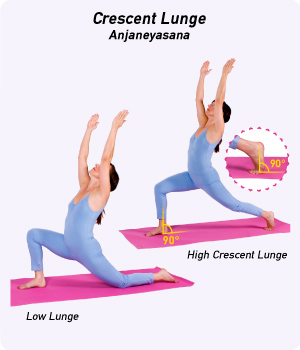
Crescent Lunge — Anjaneyasana (AHN-jah-nay-AHS-uh-nuh) — stretches the hip flexors while providing a challenge to the front and back thighs. It also strengthens and stretches the abdomen, chest, and shoulders.
- Begin standing at the top of your mat. Bend your knees, fold forward, and place your hands on the mat. Then, step your left foot to the back of the mat.
- Align your right knee over the heel of your right foot.
- Come on to the ball of your back foot, lifting your heel and drawing it forward so it aligns directly over your back toes.
- Lift your back leg strongly and straighten it completely, drawing your knee and quadriceps up toward the ceiling. Beginners can keep their back knee on the mat.
- Inhale as you raise your torso to an upright position. Sweep your arms overhead. Draw your tailbone toward the floor. Gaze up at your thumbs.
- Hold for up to one minute. Step both feet forward to the top of the mat again, and come to a full standing position. Repeat on the other side.
Core Strength: Side Plank Pose
.jpg)
A powerful arm balance, Side Plank Pose — Vasisthasana (VAH-shees-THAH-suh-nuh) — strengthens the abdominal muscles and improves balance. It also tones the wrists, forearms, and shoulders. Avoid this pose if you have a serious arm, shoulder, or wrist injury.
- Start in Plank Pose (the top of a push-up): Palms flat and body extended, with your legs reaching through your heels. Step your feet together and press your weight into your right hand and forearm. Then, roll your body to the right, balancing on the outer edge of your right foot. Beginners can lower their right knee and shin to the mat, keeping their hips lifted.
- Extend your left arm to the sky, reaching through your fingertips as you lift your hips and firm your triceps muscles. Feel your shoulder blades pressing strongly into your back. Firm your thighs and press through your heels toward the floor.
- Bring your body into one straight line. Turn your gaze up to your top thumb.
- Hold for up to one minute. Exhale as you release, slowly coming back into Plank Pose. Repeat on the opposite side.
Standing Balance: Pyramid
.jpg)
Also known as Intense Side Stretch, Pyramid Pose — Parsvottanasana (PARZH-voh-tahn-AHS-uh-nuh) — stretches the spine, shoulders, hips, and hamstrings. It improves balance and posture, calms the mind, and stimulates healthy digestion.
- Begin standing at the top of your mat. Turn to the left and step your feet two to three feet apart. Place your hands on your hips. Align your heels. Turn your right (front) foot 90 degrees, so its toes point to the top of the mat. Turn your left (back) toes toward the top of the mat, about 60 degrees. Then turn to face the same direction as your front foot. Press your weight evenly through the outer edge of your back foot and the big toe of your front foot.
- Draw your left hip slightly forward, squaring your hips to the top of the mat.
- Inhale as you reach your arms out to the sides. As you exhale, reach your arms behind your back. Then, clasp your elbows. You can also bring your hands into reverse prayer position, pressing your palms together and reaching your fingers toward your head.
-
On an inhalation, elongate your torso. Exhaling, fold at the hips and extend your torso over your front leg. Keep your shoulders drawing back, but do not let the low ribs puff forward. Maintain the length of your spine. Keep the crown of your head extending forward and your tailbone reaching behind you.
- Those with more flexibility can release their arms to the floor, folding the torso completely over the front thigh. Be sure to fold from the hip, not the waist.
- Ground down through the heel of your back foot. Gaze at your front big toe.
- Hold for up to one minute. To release, press firmly through your back heel and slowly lift your torso. Release your arms and place your hands on your hips. Change the position of your feet, and repeat on the opposite side.
Recovery: Legs Up the Wall

Legs Up the Wall — Viparita Karani (VIP-uh-REE-tuh kah-RAH-nee) — stretches the back of the legs, calms the mind, and relieves fatigue and cramping in the legs and feet. Ancient yoga texts even claim that the pose will destroy old age. Modern teachers agree to its many benefits, including relief from anxiety, headaches, insomnia, mild depression, and much more.
- Set a bolster or pillow on the floor against the wall.
- Sit sideways against the wall with your lower back against the bolster.
- Gently bring your legs up onto the wall. Use your hands for balance as you shift your weight as you lie down.
- Rest your shoulders and head on the floor. Your lower back should now be fully supported by the bolster.
- Hold for 5-10 minutes, breathing with awareness.
- To release, slowly push yourself away from the wall and slide your legs to the side.
Go with the Flow
Adding yoga to your off-mountain practice can keep you flexible, energized, and stoked for the snow. Remember to have fun with it and not to push yourself too hard. When it's time to ride, you'll be ready to go!


